
Sunday, April 19, 2020
Sanding tool
Thursday, January 16, 2020


Thursday, December 27, 2012
CNC mill - X and Y axis ready..
With the X and Y axis of the CNC mill ready, I could finally do the first CNC cut.
First cut was an easy circle with manual Z feed. I am pretty pleased to see that the contraption actually seems to work!
I need to do some calibration and finish the Z axis, but this looks promising!

First cut was an easy circle with manual Z feed. I am pretty pleased to see that the contraption actually seems to work!
I need to do some calibration and finish the Z axis, but this looks promising!
Monday, December 03, 2012


Sunday, December 02, 2012


Monday, August 27, 2012
Glassing foredeck
Glass goimg on to the foredeck on our second hull. Next is waterproofing the beam bolts!
Pics showing before and after putting on the glass.


Pics showing before and after putting on the glass.
Monday, July 09, 2012
The best tools..
Frode working with our favourite tools. The variable speed angle grinder with a soft backing plate and the mass remover, aka. belt sander.

Sunday, July 08, 2012
Under beamseat spreaders
A pic showing our custom alu pieces that will spread the load from the bolts under the whole beamseat.
Gudgeon blanks
Just a smalt post showing the mould and gudgeon blank we pulled off it. All carbon which will be cut and finalized before it is mounted on the transoms.


Saturday, July 07, 2012
80gsm glass arrived
Finally the glass for the decks arrived. Had to order this from Germany.. HP Textiles is a very good supplier. Ships quickly and I had a hard time sourcing 80gsm glass in Norway. Customs delayed my glass for days and days though.
Now it is here so some glassing is in the schedule.
Now it is here so some glassing is in the schedule.
Friday, June 15, 2012
In between boatbuilding - CNC mill!
In between the boatbuilding I also work on converting a table top mill to CNC control. Great fun as metalworking is an almost unknown skill to me.
Picture of the first motor mount with stepper.

Picture of the first motor mount with stepper.

Homemade carbon chainplates.. Experimental


Inside the hole in the chainplate is a stainless steel tube to take any abrasion. This steel is isolated from the carbon by two layers of 200gsm glass.
You can read about the stress test we did here: http://www.catsailor.com/forums/ubbthreads.php?ubb=showflat&Number=247737#Post247737
Here are some pics from the stress test:
Getting the test rig ready:


Tuesday, June 12, 2012
Been a while..
We have been working on repetitive tasks for a while now. But finally something more interesting to show!
Hulls are now mostly complete. Still some details to do under the beamseats to make it all waterproof and the rear plywood deck to install. But major work is now done. Well, at least all major work except fairing and painting..
 The picture shows the geometry of the finished platform. This was before drilling the beams and beam seats.
Currently the mainbeam have been seated with epoxy and is now hardening in my workshop. Pictures later :-)
We are now going to work on more interesting stuff and new stuff, so updates will be more frequent.
Hulls are now mostly complete. Still some details to do under the beamseats to make it all waterproof and the rear plywood deck to install. But major work is now done. Well, at least all major work except fairing and painting..

Currently the mainbeam have been seated with epoxy and is now hardening in my workshop. Pictures later :-)
We are now going to work on more interesting stuff and new stuff, so updates will be more frequent.
Tuesday, January 25, 2011
Insurance..
Due to differences between the plywood building plans and the implementation in strip plank, we decided to add a little bit to the beam seat structure. Aft of the beam seats we have added a bit of ply which we will tape the beam seat to. Then tape the ply to the hull sides.. In theory, this should make the structure strong enough for our 85kg and 98kg dry weight.

All the mistakes..
Ok, we have had our share of mess ups, and a few "quick" solutions..
First, the carbon trick to transfer loads from the bows to the mainbeam and main bulkhead..

Then we re-read the building instructions, and realised that we had a bulkhead in the wrong place. Were we going to tear the bulkhead out and re-install? Nope, we created this beauty instead.. Note to next hull, install bulkhead in right place! There are supports in the bottom and top for the daggerboard well.


Thursday, August 26, 2010
F16 bridle fitting..

Just a quick pic of the bridle fitting half- installed. Hopefully taping the keel seam and the bulkheads next week. Then it is off to deck beams and beam seats. Yahooo!!
(Now the ground is beginning to burn under us, foils foils foils..)
Saturday, August 07, 2010
Carbon beams.
Our original plan was for carbon beams, as sourcing alu beams was more expensive. Thanks to being close to a carbon manufacturing plant we got a good deal on carbon so it was very cost effective for us.
That was until we found no less than four good alu beam candidates lying around. One set of vintage Tornado beams and one set of beams from another 16 foot cat. So carbon beams are off, for now.. We want to get on the water!!
That was until we found no less than four good alu beam candidates lying around. One set of vintage Tornado beams and one set of beams from another 16 foot cat. So carbon beams are off, for now.. We want to get on the water!!
Elvis has left the building..
Well, not Elvis but Omar.. Life got in the way so he had to pull out of the project. This leaves us with four hull panels extra. Hmmm, what can we do with those, I wonder.. :-)
Friday, August 06, 2010
Bulkheads and gluing the panel seam
Bulkheads tabbed into place in hull #1, and gluing the keel seam between panels. Soon ready to be glassed.
Matching up the panels takes a little bit of work, but it is realitively straigh forward when using straps with small pieces of wood under to match up the two panels along the keel.

Tools of the trade!

Matching up the panels takes a little bit of work, but it is realitively straigh forward when using straps with small pieces of wood under to match up the two panels along the keel.

Tools of the trade!

It has been a while.
The blog have not been updated in a while. Blog burnout I guess..
The project have proceeded though, at a slow but steady pace. All 12 hull panels are now done (and we did celebrate that event. Quite heavily from what I remember of it).
The project have proceeded though, at a slow but steady pace. All 12 hull panels are now done (and we did celebrate that event. Quite heavily from what I remember of it).
Sunday, November 29, 2009
Panel #10 planked..
Rolf picked up 4000 staples saturday between other tasks. Sunday panel #10 was all planked. 5 hours from start to finish. Not bad I think.
Next weekend it would be great to have #11 out of 12 planked.
Winter has come and temperature in the workshop dropped quite a bit with the snow. We have got our hands on a bit of bubble wrap and will try that on the single pane window and the garage port.
Since first of august we have 116,5 hours in the project. Most of it spent on producing hull panels, ripping planks etc. It is good to get some progress, even if the number of hours spent on the project is substantial.
Friday, November 27, 2009
Out of staples!!
Rolf taped over the male mould tonight with packing tape. We do this to stop the hull from sticking to the mould after glassing. We definately dont want that so this is an important job.
The first planks was also fitted, but after just four planks, we ran out of staples! Got to remember to buy more tomorrow!
The first planks was also fitted, but after just four planks, we ran out of staples! Got to remember to buy more tomorrow!
Wednesday, November 25, 2009
Progressing slowly..
Tonight Omar and Rolf ripped more strips for panel 10,11 and 12. Cleaned up all the sawdust and put the strips in storage.
Afterwards we removed #8 from the female mould and flipped #9 into the female mould. Set it up and clamped it to the mould. Filled all voids and cut off some of the longer planks. Friday night it will be possible to either do some sanding or begin planking of #10.. The ambition is to finish planking and gluing #10 this weekend. We will see..
Afterwards we removed #8 from the female mould and flipped #9 into the female mould. Set it up and clamped it to the mould. Filled all voids and cut off some of the longer planks. Friday night it will be possible to either do some sanding or begin planking of #10.. The ambition is to finish planking and gluing #10 this weekend. We will see..
Cutting planks..
Frode and Rolf spent the night in company with a circular saw and some planks.. A load of new strips is in place and there is still one more 1 inch plank to rip.
Panel 9 glassed on the outside.
One thing less to do.. Need to be quick in turning the panel over and glassing the inside as well to stop warping and twisting.
Thursday, November 12, 2009
Panel #9 pre-coated
So that is it. Just some light washing and sanding left and then it is time to get the glass on #9..
Friday, November 06, 2009
Panel #9 planked and glued..
Title says most of it. #9 was planked in 3.5 hours, had the gunwhale laminated the same evening and the whole thing was glued. Now that is real progress.
Tonight I pulled about half of the staples on it. Plan to finish the job of pulling staples tomorrow and perhaps do some sanding. Have to shop for some more wood to convert into boat.
Tonight I pulled about half of the staples on it. Plan to finish the job of pulling staples tomorrow and perhaps do some sanding. Have to shop for some more wood to convert into boat.
Tuesday, November 03, 2009
Panel #8 glassed on the inside.
Another evening in the spacesuit applying glass and epoxy to the inside of pane #8. Some issues with the fillet where we added too much chopped glass and removed to much when rounding it. Also a zillion outgassing bubbles today. We suspect the 100watts lightsource that was positioned above the panel. Nothing 5 minutes with the garage door open did not fix.
Thursday, October 29, 2009
Panel #7 done, and then some.
Panel #7 was moved to Omars carport last night, for storage. Now the female mould is occupied by panel #8. The inside of #8 was sanded during last nights session. Finished preliminary sanding and filled all gaps with thickened epoxy. The sanding gear Florin sent me from Romania really makes all the difference. Variable speed angle grinder, 36grit discs and some foam pads. Stuff it is quite hard to get in Norway, or at least in Molde and on the 'net. Thanks a lot Florin!
Omar and Frode also cut the glass for a new test-tube which I hope to get startet pretty soon. Exciting times!
Omar and Frode also cut the glass for a new test-tube which I hope to get startet pretty soon. Exciting times!
Tuesday, October 20, 2009
Sunday, October 04, 2009
 I am getting really good at this..
Thursday, October 01, 2009
Ok...
The quick fix was not good enough. After the staples was removed the hull pulled apart from the tension in the planks. Oh well.. That failure is no longer in the workshop and the new hull panel #8 is well underway. Lesson learnt I hope!
Friday, September 25, 2009
Quick fixes sometimes works..
Looks like the quick fix worked well enough. At least the epoxy have hardened so the strips stay together. Next point is laminating a new gunwhale on #8, pulling staples and filling the marks left by the chisel when we removed the faulty gunwhale..
Then it is off to sand the inside of #7 and #8 :)
Then it is off to sand the inside of #7 and #8 :)
Tuesday, September 22, 2009
Quick fixes.. fingers crossed
Frode and I spent two hours tonight chiseling off the gunwhale on #8, cleaning both #7 and #8 as well as possible and re-gluing. This time we made sure the epoxy was mixed correctly! Will be very, very, exciting to see how this went tomorrow evening!
First epoxy mishap.. *bugger*!
The day had to come, and now it is here.
Looks like we have mixed hardener and hardener instead of resin and hardener. Consequenses: Gluing of panel #8 will not be optimal, and it will be kind of a mess. Gunwhale on panel #8 might be suspect. The filling done on the inside of panel #7 need to be re-done. Some stuff will have to be re-done obviously..
I hope the lessons is learnt so we dont do this again. It is a shame really as we did so much that night..
Sunday, September 13, 2009
Panel #8 planked
Hull panel #8 is all planked. Next task is laminating the gunwhales and gluing the panel with epoxy. Then we can sand the inside of #7 and the outside of #8 in one go.
Sunday, September 06, 2009
Panel #7 glassed on the outside
That is it, panel 7 is glassed on the outside and ready for sanding+glassing on the inside. Planking on #8 will commence immediately.
Thursday, May 14, 2009
Planking #7
Sunday evening I was able to tape all the stations + gunwhale mould + table with packaging tape to isolate the mould from the hull panel. I also got around to actually fitting 3 planks.
Last night I snuck down in the workshop for an hour and fitted 6 more planks. Planking a hull is actually a quite fast task. The time hog is the sanding.. Two more sessions and I guess the hull panel is planked + one session for the gunwhale. Then it is sanding and glassing before we try to match the hull panels. The big moment.. Got to remember to tape that moment. It will either be a "kodak moment" if the panels are ill fitting or assymetrical, or big grins if it is just right.
Last night I snuck down in the workshop for an hour and fitted 6 more planks. Planking a hull is actually a quite fast task. The time hog is the sanding.. Two more sessions and I guess the hull panel is planked + one session for the gunwhale. Then it is sanding and glassing before we try to match the hull panels. The big moment.. Got to remember to tape that moment. It will either be a "kodak moment" if the panels are ill fitting or assymetrical, or big grins if it is just right.
Sunday, May 10, 2009
Test beam made in glass.
First test tube is out of the mould. Last night around 2130 hours I began cutting and wetting out glass. Three layers of glass and three additional layers where the beam is to go. The evenings goal was to learn how to do this properly, and I certainly reached that goal!
1: Have a table for wetting out long enough for the whole piece of cloth you are working on. If not, the cloth will be hard to wet out properly and you will have to handle the cloth some, which it dont like.
2: This is a two person job. One mixing epoxy and one applying it. 3 persons would be even better.
2: Put all the layers of cloth in position on the table before putting them into the mould. Otherwise it is hard to align them properly.
3: The bag should not be too large, just a bit larger than the mould. If it is too large you get wrinkles!
After running the pressure up to 2 bar last night, the bag decided to start leaking. Somehow it managed to rupture close to the air-inlet. It was not a large hole, just 2 cm, but enough to create trouble. To try and save the situation I ran the compressor continously, but I did not take the chance on letting it run without rest for the whole night. The compressor managed to hold the pressure at 2 bar, but I suspect that the result would have been even better without the leak.
As it is, the tube is not perfect. At some places there are dents.. It looks like these dents are located where the bag have been twisted a bit? A smaller bag and no leaks should help. As the picture below shows, there is a dent where the bag have "folded" due to excessive materials in the bag.
Here is a pic of the bag inflated, resting on the bottom part of the mould. It is quite a bit larger than the mould, which I think is part of the problem.
Anyway, before committing carbon fibers, I will want to make another test run with glass.
The good news is that the finish of the beam is very nice and the method obviously works. Even with 6 layers of glass at one beam end the pressure made the laminate conform very well to the mould and no air-bubbles, gaps or anything. Overlap was very hard to see as well, so the pressure must have been immense. Considering -1bar is a perfect vacuum, 3 bars should be more than enough to consolidate the laminate for our beams.
Here is a pic of Omar with our beam mould. Looks quite dangerous! Considering that the mould holds 3 bar of pressure when the pic was taken, Omar was a bit skitterish :-)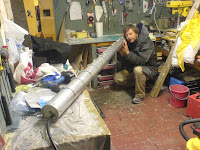
1: Have a table for wetting out long enough for the whole piece of cloth you are working on. If not, the cloth will be hard to wet out properly and you will have to handle the cloth some, which it dont like.
2: This is a two person job. One mixing epoxy and one applying it. 3 persons would be even better.
2: Put all the layers of cloth in position on the table before putting them into the mould. Otherwise it is hard to align them properly.
3: The bag should not be too large, just a bit larger than the mould. If it is too large you get wrinkles!
After running the pressure up to 2 bar last night, the bag decided to start leaking. Somehow it managed to rupture close to the air-inlet. It was not a large hole, just 2 cm, but enough to create trouble. To try and save the situation I ran the compressor continously, but I did not take the chance on letting it run without rest for the whole night. The compressor managed to hold the pressure at 2 bar, but I suspect that the result would have been even better without the leak.
As it is, the tube is not perfect. At some places there are dents.. It looks like these dents are located where the bag have been twisted a bit? A smaller bag and no leaks should help. As the picture below shows, there is a dent where the bag have "folded" due to excessive materials in the bag.

Here is a pic of the bag inflated, resting on the bottom part of the mould. It is quite a bit larger than the mould, which I think is part of the problem.

Anyway, before committing carbon fibers, I will want to make another test run with glass.
The good news is that the finish of the beam is very nice and the method obviously works. Even with 6 layers of glass at one beam end the pressure made the laminate conform very well to the mould and no air-bubbles, gaps or anything. Overlap was very hard to see as well, so the pressure must have been immense. Considering -1bar is a perfect vacuum, 3 bars should be more than enough to consolidate the laminate for our beams.
Here is a pic of Omar with our beam mould. Looks quite dangerous! Considering that the mould holds 3 bar of pressure when the pic was taken, Omar was a bit skitterish :-)

Thursday, May 07, 2009
Gahh, compressor woes..
So I had to open the 400V controller for the compressor motor to adjust the working pressure. I was able to make the compressor stop at 3bar, but then it drops down to 1 bar before it turns on again. Not an optimal solution! Will have to seek advice with those in the know how in the composite business..
Compressor exploring..
We stress tested the mould last night. 3 bar of pressure inside it and all OK.
The bag developed a small leak at each end of the mould so we need to check that, but otherwise the system worked perfectly. Tonights mission is to find out how I can make the compressor turn itself on when the pressure falls to 2.5 bar and off again when it hits 3 bar..
The bag developed a small leak at each end of the mould so we need to check that, but otherwise the system worked perfectly. Tonights mission is to find out how I can make the compressor turn itself on when the pressure falls to 2.5 bar and off again when it hits 3 bar..
Saturday, May 02, 2009
Gunwhale mould in position.
Tonight I routed the insets for the gunwhale mould and fitted it to the stations on the strongback. We are now ready to begin building panel #7! Hooray!!
Frode talked about coming over tomorrow, if he does we can turn the strongback over so it is possible to begin putting planks on the mould.
Frode talked about coming over tomorrow, if he does we can turn the strongback over so it is possible to begin putting planks on the mould.
Tuesday, April 21, 2009
Cutting planks..
Since last update we have been busy cutting strips for the next hull parts and waxing the crossbeam mould. I dont know how many strips we have in storage now, but it is rather a lot..
Tomorrow night I have starter duty at the sailing club, but afterwards I'll do the final aligning of the stations after flipping them over.
Frode have gone to Spain for two weeks so Omar and I am free to head of on any wild tangent we can imagine. :-)
Tomorrow night I have starter duty at the sailing club, but afterwards I'll do the final aligning of the stations after flipping them over.
Frode have gone to Spain for two weeks so Omar and I am free to head of on any wild tangent we can imagine. :-)
Friday, March 20, 2009
TADAAAAA
Last night we could finally begin flipping the stations over. What a great day! Marks the halfway point in the hull construction process.
The process was a bit slow as some epoxy had dripped on the table, and we definately had to remove the high spots to position the stations correctly. Not long now until we can join some halves and look at something resembling a complete hull. Installing bulkheads, beam seats etc should be a breeze after all the strip planking.
Next week I hope to have some pics of the beam mould and the setup there. Just need to source 20 hose clamps of 100mm diam at a reasonable cost and some other stuff needed.
Here is a pic of Frode, enjoying flipping stations over and removing epoxy drips from the screwheads. Note to self, tape over the screwheads this time. Aligning the stations precisely is very important so we spend some time on each station to make sure it is flipped right.
And to top it off, here is a bonus pic of Frode:
 (he have begun to complain over being the favourite motive on the blog but since he dont take pictures and dont upload/maintain the blog he dont get to choose which pictures are put up here :-D )
The experienced photographer will notice the height difference between motive and photographer. He really is that tall.
The process was a bit slow as some epoxy had dripped on the table, and we definately had to remove the high spots to position the stations correctly. Not long now until we can join some halves and look at something resembling a complete hull. Installing bulkheads, beam seats etc should be a breeze after all the strip planking.
Next week I hope to have some pics of the beam mould and the setup there. Just need to source 20 hose clamps of 100mm diam at a reasonable cost and some other stuff needed.

Here is a pic of Frode, enjoying flipping stations over and removing epoxy drips from the screwheads. Note to self, tape over the screwheads this time. Aligning the stations precisely is very important so we spend some time on each station to make sure it is flipped right.
And to top it off, here is a bonus pic of Frode:
 (he have begun to complain over being the favourite motive on the blog but since he dont take pictures and dont upload/maintain the blog he dont get to choose which pictures are put up here :-D )
The experienced photographer will notice the height difference between motive and photographer. He really is that tall.
Wednesday, March 18, 2009
Inside of #6 glassed.
An easy two hour session saw panel #6 glassed on the inside. Omar mixing epoxy while Frode and I laminate. This time we had no pre-coat so we had to use 6 (or was it 7, Omar lost count somewhere) batches a 132grams of epoxy. With a pre-coat on we need barely 5 batches.
Now the stations in the mould have to be flipped over so we can begin to build the other side of the hulls. Imagine that we have done no less than six strip plank panels!
We also had some discussions tonight on progress towards summer. Looks like we are going to try working on the boats two nights a week for a while. We can split the work now between building hulls and all the other bits and parts like beams, foils (Hmmm, still no plugs for the foils in the mail.. Need to check on my kind source), rudder system, spi poles and other bits and ends.
Frode have been shopping carnuba wax for the beam mould! Now we can begin giving it the neccesary layers of wax before building test tubes. The staff at the car equipment shop had no idea what carnuba wax was.. Bloody expensive stuff also!
Subscribe to:
Comments (Atom)