Looks like the quick fix worked well enough. At least the epoxy have hardened so the strips stay together. Next point is laminating a new gunwhale on #8, pulling staples and filling the marks left by the chisel when we removed the faulty gunwhale..
Then it is off to sand the inside of #7 and #8 :)
Friday, September 25, 2009

Tuesday, September 22, 2009
Quick fixes.. fingers crossed
Frode and I spent two hours tonight chiseling off the gunwhale on #8, cleaning both #7 and #8 as well as possible and re-gluing. This time we made sure the epoxy was mixed correctly! Will be very, very, exciting to see how this went tomorrow evening!
First epoxy mishap.. *bugger*!
The day had to come, and now it is here.
Looks like we have mixed hardener and hardener instead of resin and hardener. Consequenses: Gluing of panel #8 will not be optimal, and it will be kind of a mess. Gunwhale on panel #8 might be suspect. The filling done on the inside of panel #7 need to be re-done. Some stuff will have to be re-done obviously..
I hope the lessons is learnt so we dont do this again. It is a shame really as we did so much that night..
Looks like we have mixed hardener and hardener instead of resin and hardener. Consequenses: Gluing of panel #8 will not be optimal, and it will be kind of a mess. Gunwhale on panel #8 might be suspect. The filling done on the inside of panel #7 need to be re-done. Some stuff will have to be re-done obviously..
I hope the lessons is learnt so we dont do this again. It is a shame really as we did so much that night..
Sunday, September 13, 2009
Panel #8 planked
Hull panel #8 is all planked. Next task is laminating the gunwhales and gluing the panel with epoxy. Then we can sand the inside of #7 and the outside of #8 in one go.
Sunday, September 06, 2009
Panel #7 glassed on the outside
That is it, panel 7 is glassed on the outside and ready for sanding+glassing on the inside. Planking on #8 will commence immediately.
Thursday, May 14, 2009
Planking #7
Sunday evening I was able to tape all the stations + gunwhale mould + table with packaging tape to isolate the mould from the hull panel. I also got around to actually fitting 3 planks.
Last night I snuck down in the workshop for an hour and fitted 6 more planks. Planking a hull is actually a quite fast task. The time hog is the sanding.. Two more sessions and I guess the hull panel is planked + one session for the gunwhale. Then it is sanding and glassing before we try to match the hull panels. The big moment.. Got to remember to tape that moment. It will either be a "kodak moment" if the panels are ill fitting or assymetrical, or big grins if it is just right.
Last night I snuck down in the workshop for an hour and fitted 6 more planks. Planking a hull is actually a quite fast task. The time hog is the sanding.. Two more sessions and I guess the hull panel is planked + one session for the gunwhale. Then it is sanding and glassing before we try to match the hull panels. The big moment.. Got to remember to tape that moment. It will either be a "kodak moment" if the panels are ill fitting or assymetrical, or big grins if it is just right.
Sunday, May 10, 2009
Test beam made in glass.
First test tube is out of the mould. Last night around 2130 hours I began cutting and wetting out glass. Three layers of glass and three additional layers where the beam is to go. The evenings goal was to learn how to do this properly, and I certainly reached that goal!
1: Have a table for wetting out long enough for the whole piece of cloth you are working on. If not, the cloth will be hard to wet out properly and you will have to handle the cloth some, which it dont like.
2: This is a two person job. One mixing epoxy and one applying it. 3 persons would be even better.
2: Put all the layers of cloth in position on the table before putting them into the mould. Otherwise it is hard to align them properly.
3: The bag should not be too large, just a bit larger than the mould. If it is too large you get wrinkles!
After running the pressure up to 2 bar last night, the bag decided to start leaking. Somehow it managed to rupture close to the air-inlet. It was not a large hole, just 2 cm, but enough to create trouble. To try and save the situation I ran the compressor continously, but I did not take the chance on letting it run without rest for the whole night. The compressor managed to hold the pressure at 2 bar, but I suspect that the result would have been even better without the leak.
As it is, the tube is not perfect. At some places there are dents.. It looks like these dents are located where the bag have been twisted a bit? A smaller bag and no leaks should help. As the picture below shows, there is a dent where the bag have "folded" due to excessive materials in the bag.
Here is a pic of the bag inflated, resting on the bottom part of the mould. It is quite a bit larger than the mould, which I think is part of the problem.
Anyway, before committing carbon fibers, I will want to make another test run with glass.
The good news is that the finish of the beam is very nice and the method obviously works. Even with 6 layers of glass at one beam end the pressure made the laminate conform very well to the mould and no air-bubbles, gaps or anything. Overlap was very hard to see as well, so the pressure must have been immense. Considering -1bar is a perfect vacuum, 3 bars should be more than enough to consolidate the laminate for our beams.
Here is a pic of Omar with our beam mould. Looks quite dangerous! Considering that the mould holds 3 bar of pressure when the pic was taken, Omar was a bit skitterish :-)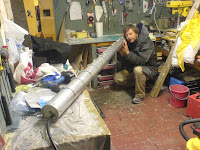
1: Have a table for wetting out long enough for the whole piece of cloth you are working on. If not, the cloth will be hard to wet out properly and you will have to handle the cloth some, which it dont like.
2: This is a two person job. One mixing epoxy and one applying it. 3 persons would be even better.
2: Put all the layers of cloth in position on the table before putting them into the mould. Otherwise it is hard to align them properly.
3: The bag should not be too large, just a bit larger than the mould. If it is too large you get wrinkles!
After running the pressure up to 2 bar last night, the bag decided to start leaking. Somehow it managed to rupture close to the air-inlet. It was not a large hole, just 2 cm, but enough to create trouble. To try and save the situation I ran the compressor continously, but I did not take the chance on letting it run without rest for the whole night. The compressor managed to hold the pressure at 2 bar, but I suspect that the result would have been even better without the leak.
As it is, the tube is not perfect. At some places there are dents.. It looks like these dents are located where the bag have been twisted a bit? A smaller bag and no leaks should help. As the picture below shows, there is a dent where the bag have "folded" due to excessive materials in the bag.

Here is a pic of the bag inflated, resting on the bottom part of the mould. It is quite a bit larger than the mould, which I think is part of the problem.

Anyway, before committing carbon fibers, I will want to make another test run with glass.
The good news is that the finish of the beam is very nice and the method obviously works. Even with 6 layers of glass at one beam end the pressure made the laminate conform very well to the mould and no air-bubbles, gaps or anything. Overlap was very hard to see as well, so the pressure must have been immense. Considering -1bar is a perfect vacuum, 3 bars should be more than enough to consolidate the laminate for our beams.
Here is a pic of Omar with our beam mould. Looks quite dangerous! Considering that the mould holds 3 bar of pressure when the pic was taken, Omar was a bit skitterish :-)

Thursday, May 07, 2009
Gahh, compressor woes..
So I had to open the 400V controller for the compressor motor to adjust the working pressure. I was able to make the compressor stop at 3bar, but then it drops down to 1 bar before it turns on again. Not an optimal solution! Will have to seek advice with those in the know how in the composite business..
Compressor exploring..
We stress tested the mould last night. 3 bar of pressure inside it and all OK.
The bag developed a small leak at each end of the mould so we need to check that, but otherwise the system worked perfectly. Tonights mission is to find out how I can make the compressor turn itself on when the pressure falls to 2.5 bar and off again when it hits 3 bar..
The bag developed a small leak at each end of the mould so we need to check that, but otherwise the system worked perfectly. Tonights mission is to find out how I can make the compressor turn itself on when the pressure falls to 2.5 bar and off again when it hits 3 bar..
Saturday, May 02, 2009
Gunwhale mould in position.
Tonight I routed the insets for the gunwhale mould and fitted it to the stations on the strongback. We are now ready to begin building panel #7! Hooray!!
Frode talked about coming over tomorrow, if he does we can turn the strongback over so it is possible to begin putting planks on the mould.
Frode talked about coming over tomorrow, if he does we can turn the strongback over so it is possible to begin putting planks on the mould.
Tuesday, April 21, 2009
Cutting planks..
Since last update we have been busy cutting strips for the next hull parts and waxing the crossbeam mould. I dont know how many strips we have in storage now, but it is rather a lot..
Tomorrow night I have starter duty at the sailing club, but afterwards I'll do the final aligning of the stations after flipping them over.
Frode have gone to Spain for two weeks so Omar and I am free to head of on any wild tangent we can imagine. :-)
Tomorrow night I have starter duty at the sailing club, but afterwards I'll do the final aligning of the stations after flipping them over.
Frode have gone to Spain for two weeks so Omar and I am free to head of on any wild tangent we can imagine. :-)
Friday, March 20, 2009
TADAAAAA
Last night we could finally begin flipping the stations over. What a great day! Marks the halfway point in the hull construction process.
The process was a bit slow as some epoxy had dripped on the table, and we definately had to remove the high spots to position the stations correctly. Not long now until we can join some halves and look at something resembling a complete hull. Installing bulkheads, beam seats etc should be a breeze after all the strip planking.
Next week I hope to have some pics of the beam mould and the setup there. Just need to source 20 hose clamps of 100mm diam at a reasonable cost and some other stuff needed.
Here is a pic of Frode, enjoying flipping stations over and removing epoxy drips from the screwheads. Note to self, tape over the screwheads this time. Aligning the stations precisely is very important so we spend some time on each station to make sure it is flipped right.
And to top it off, here is a bonus pic of Frode:
 (he have begun to complain over being the favourite motive on the blog but since he dont take pictures and dont upload/maintain the blog he dont get to choose which pictures are put up here :-D )
The experienced photographer will notice the height difference between motive and photographer. He really is that tall.
The process was a bit slow as some epoxy had dripped on the table, and we definately had to remove the high spots to position the stations correctly. Not long now until we can join some halves and look at something resembling a complete hull. Installing bulkheads, beam seats etc should be a breeze after all the strip planking.
Next week I hope to have some pics of the beam mould and the setup there. Just need to source 20 hose clamps of 100mm diam at a reasonable cost and some other stuff needed.

Here is a pic of Frode, enjoying flipping stations over and removing epoxy drips from the screwheads. Note to self, tape over the screwheads this time. Aligning the stations precisely is very important so we spend some time on each station to make sure it is flipped right.
And to top it off, here is a bonus pic of Frode:
 (he have begun to complain over being the favourite motive on the blog but since he dont take pictures and dont upload/maintain the blog he dont get to choose which pictures are put up here :-D )
The experienced photographer will notice the height difference between motive and photographer. He really is that tall.
Wednesday, March 18, 2009
Inside of #6 glassed.
An easy two hour session saw panel #6 glassed on the inside. Omar mixing epoxy while Frode and I laminate. This time we had no pre-coat so we had to use 6 (or was it 7, Omar lost count somewhere) batches a 132grams of epoxy. With a pre-coat on we need barely 5 batches.
Now the stations in the mould have to be flipped over so we can begin to build the other side of the hulls. Imagine that we have done no less than six strip plank panels!
We also had some discussions tonight on progress towards summer. Looks like we are going to try working on the boats two nights a week for a while. We can split the work now between building hulls and all the other bits and parts like beams, foils (Hmmm, still no plugs for the foils in the mail.. Need to check on my kind source), rudder system, spi poles and other bits and ends.
Frode have been shopping carnuba wax for the beam mould! Now we can begin giving it the neccesary layers of wax before building test tubes. The staff at the car equipment shop had no idea what carnuba wax was.. Bloody expensive stuff also!
Now the stations in the mould have to be flipped over so we can begin to build the other side of the hulls. Imagine that we have done no less than six strip plank panels!
We also had some discussions tonight on progress towards summer. Looks like we are going to try working on the boats two nights a week for a while. We can split the work now between building hulls and all the other bits and parts like beams, foils (Hmmm, still no plugs for the foils in the mail.. Need to check on my kind source), rudder system, spi poles and other bits and ends.
Frode have been shopping carnuba wax for the beam mould! Now we can begin giving it the neccesary layers of wax before building test tubes. The staff at the car equipment shop had no idea what carnuba wax was.. Bloody expensive stuff also!
Tuesday, March 17, 2009
Another hour..
Another hour spent sanding the inside of #6. The tally is up to two hours by now, and I still have to shape the gunwhale to blend in with the fillet to go there (for the glass). It is 90% done though!
If Frode brings his angle grinder tomorrow night, I'll make short work of the gunwhale shaping. This is time well spent. Just 6 more panels to go (*groan*)
If Frode brings his angle grinder tomorrow night, I'll make short work of the gunwhale shaping. This is time well spent. Just 6 more panels to go (*groan*)
Sunday, March 15, 2009
Sanding the inside of #6
I had one hour available today, so I jogged down to the workshop to start sanding the inside of #6. When my hour was up, I was about halfway down the length of the panel. 40grit sure makes progress. Just wish my angle grinder was not busted, then I could have been done with the whole panel.
We do produce some dust with all the sanding we do! Here is a pic from the bow section after todays session.
We do produce some dust with all the sanding we do! Here is a pic from the bow section after todays session.

Friday, March 13, 2009
Progress on #6
Last wednesday we glassed panel #6 on the outside. Here is a pic of the finished result before the epoxy kicked. Spent 2 hours from start to end of the whole operation. We are definately getting better at this.
Tonight I was down in the workshop again to pull the panel off the mould and put it into the female mould/crib for glassing on the inside. Since the angle grinder is bust I spent the rest of the nigth filling any gaps on the inside. There are always some at the bottom of the boat no matter how careful I am with the plane. Sunday I might be able to sand down the inside and pre-coat for glassing the coming week. Who knows :-)
Anyway, we are near the point where we can flip the stations over and begin building the other halves of the hulls. That makes us this happy:
We have also progressed on the mould for the beams. The mould is in the workshop, alu tube split on a large CNC mill. Really nice split! Here is Omar holding the cast end-plugs
Last, I could not help myself but put up a picture of a sunrise as seen from my office window. It was on the phone with the building photos so..
 Spent 2 hours from start to end of the whole operation. We are definately getting better at this.
Tonight I was down in the workshop again to pull the panel off the mould and put it into the female mould/crib for glassing on the inside. Since the angle grinder is bust I spent the rest of the nigth filling any gaps on the inside. There are always some at the bottom of the boat no matter how careful I am with the plane. Sunday I might be able to sand down the inside and pre-coat for glassing the coming week. Who knows :-)
Anyway, we are near the point where we can flip the stations over and begin building the other halves of the hulls. That makes us this happy:

We have also progressed on the mould for the beams. The mould is in the workshop, alu tube split on a large CNC mill. Really nice split! Here is Omar holding the cast end-plugs

Last, I could not help myself but put up a picture of a sunrise as seen from my office window. It was on the phone with the building photos so..

Saturday, March 07, 2009
#6 is pre-coated
After some snafu with sanding pads having the wrong side of the velcro glued to them (we dont mention names, do we Frode?) and other fun mishaps, #6 is now ready for glassing. Tonight I put on a layer of epoxy as a pre-coat before glassing. About 60 grams of epoxy was neccesary to cover the whole hull with a thin layer.
I also cast the first end-plug for the beam mould. 260grams of epoxy mixed at 50% with chopped glass should do the trick at 2 bar.
I also cast the first end-plug for the beam mould. 260grams of epoxy mixed at 50% with chopped glass should do the trick at 2 bar.
Wednesday, February 18, 2009
#6 roughly sanded.
Tonight all three of us was present, and I began the with the angle grinder. It is such a quick way to remove epoxy that using the beltsander is a drugde. Unfortunately the chineese quality angle grinder burnt out after just 5 minutes..
Frode finished off the rest with the belt sander. I was more than happy to let him have a go at it after doing the 5 previous panels. He did good work, so I'll let him do the same with #7 ;)
We also filled all staple holes and spent a good time cleaning up in the workshop so we can begin work on beams and foils.
Frode finished off the rest with the belt sander. I was more than happy to let him have a go at it after doing the 5 previous panels. He did good work, so I'll let him do the same with #7 ;)
We also filled all staple holes and spent a good time cleaning up in the workshop so we can begin work on beams and foils.
Sunday, February 15, 2009
Staples pulled on #6.
Frode and I pulled all the staples from panel #6 today. 75 minutes total needed to remove the staples. Next opportunity I get, I will be busy with the angle grinder to remove epoxy.
Friday, February 13, 2009
#6 glued.
Spent an hour gluing #6 tonight. It takes an hour and 10 minutes to glue the panel properly.. Panel #7 I will tally the hours for. This is probably one of the slowest building techniques on earth, but still more fun than working with foam ;) Wonder how stiff the hulls will be..
Wednesday, February 11, 2009
Panel #6 planked and filled

Tonight Frode, Omar and fitted the last two planks on #6. Laminated and installed the gunwhale, filled all knotholes and fixed some other stuff as well. Great evening!
Sunday, February 08, 2009
#6, just two more planks to go..
Two more planks after tonight, and #6 is ready to recieve gunwhales and filling/gluing.
Friday, January 30, 2009
More planks fitted on #6
Tonight I spent a bit more than an hour in the workshop, fitting planks. Next session I'll fill in the 'opening' with planks. Then the gunwhale and glue the whole stuff together. If I am a really good boy, the hull can be glued this weekend or during the next week.
Thursday, January 29, 2009
Inside of panel #5 glassed.
Last night Frode, Omar and I glassed the inside of panel #5. Quite an enjoyable and efficient evening. Done in two hours with Frode and me laminating and Omar mixing epoxy batches. 550grams of epoxy used, and then we squeeged off some so not the full weight. Will be interesting to weight this panel as we have not used the pre-coat technique on these.
Now, on for panel #6. The big one before we can flip the stations over! I have already put some planks in place, so it is just a matter of continuing. Overtime work have taken much time lately, and I have a cold that drains my energy, but much of the planking on #6 should be done during the weekend.
A co-worker and I have begun chatting about building a plane. A replica of a WW2 Mosquito would be fun ;)
Now, on for panel #6. The big one before we can flip the stations over! I have already put some planks in place, so it is just a matter of continuing. Overtime work have taken much time lately, and I have a cold that drains my energy, but much of the planking on #6 should be done during the weekend.
A co-worker and I have begun chatting about building a plane. A replica of a WW2 Mosquito would be fun ;)
Sunday, January 25, 2009
Some light sanding and planking.
Last night I sanded some fairing done inside panel #5. We had filled some gaps and knotholes with epoxy mixed with microballoons. It is the first time I have sanded microballoons, and that was a relatively pleasant experience. Sands really easily.
I also planked a bit more on panel #6. Hopefully I can glass the inside of #5 tonight, if I dont have to work more overtime..
I also planked a bit more on panel #6. Hopefully I can glass the inside of #5 tonight, if I dont have to work more overtime..
Sunday, January 18, 2009
A quiet weekend
This weekend was reserved for the family, in a cabin far, far away :-)
Sunday evening Frode came over, we planed down the gunwhale and filled a few gaps where I did not use the plane sparingly enough while planking. We also re-taped the mould and I got to fit six planks before I called it a night. Nice to have started on panel #6. Last one before we flip the stations over.
Sunday evening Frode came over, we planed down the gunwhale and filled a few gaps where I did not use the plane sparingly enough while planking. We also re-taped the mould and I got to fit six planks before I called it a night. Nice to have started on panel #6. Last one before we flip the stations over.
Thursday, January 15, 2009
By popular request.. the mould.

Here is a quick pic of the mould. Many are wondering what the mould looks like, so here is a pic showing the whole thing.
Wednesday, January 14, 2009
Done sanding the inside of panel #5
After some breakages I am finally done sanding the inside of panel #5. Sanding wood instead of epoxy is just SO much faster! The angle grinder with the cleaning pad was a real timesaver.
In the last two nights the attrition rate have been rather high. The drill used to sand the inside with a foam pad bust a bearing. This is a cheap chineese drill, so I dont worry about it. It is still under warranty as well, so.. I also bust two of the foam pads I use when sanding with the drill. Things delaminated while sanding :-( Time to find a stronger or more flexible glue I guess.
Tomorrow night I'll plane the gunwhales to shape and post some photos.
In the last two nights the attrition rate have been rather high. The drill used to sand the inside with a foam pad bust a bearing. This is a cheap chineese drill, so I dont worry about it. It is still under warranty as well, so.. I also bust two of the foam pads I use when sanding with the drill. Things delaminated while sanding :-( Time to find a stronger or more flexible glue I guess.
Tomorrow night I'll plane the gunwhales to shape and post some photos.

Wednesday, January 07, 2009
done glassing panel #5 on the outside.
Practice makes perfect. Frode, Omar and me working together put on the glass on panel #5 in two hours. Will have to pop down later tonight for a quality check, but it went on easily and looked well. I did not have time to apply the pre-coat this time, so we used 100grams more epoxy than we usually do.
We also had time to do a movie pop-quiz while glassing. Great fun, but Frode is scary with his selection of movies at times. "Nobody puts baby in a corner".. Seriously!
Friday I plan to pop the panel off the mould and start sanding the inside for glassing. Hopefully we will manage to glass the inside during the coming weekend.
We also had time to do a movie pop-quiz while glassing. Great fun, but Frode is scary with his selection of movies at times. "Nobody puts baby in a corner".. Seriously!
Friday I plan to pop the panel off the mould and start sanding the inside for glassing. Hopefully we will manage to glass the inside during the coming weekend.
Done sanding panel#5
Last night I went over panels #5 with the longboard, and the panel is now ready for glassing. Hopefully that will happen tonight, if Frode or Omar comes to assist. Aim to do this fast so I can do the quality control before I go to bed.
I skipped making a blog entry the other night after I was down working over the hull panel with the belt sander and the sanding disc. Funny how that works, much more fun to enter a blog entry after each session.
For panel #6, I will enter the working hours with each blog message. Phill Brander asked me how l many hours each panel takes and I could not give an exact answer. The best I could do was a guesstimate, so now it is time to record working hours. I will not multiply working hours with an hourly wage and get the cost though!
I skipped making a blog entry the other night after I was down working over the hull panel with the belt sander and the sanding disc. Funny how that works, much more fun to enter a blog entry after each session.
For panel #6, I will enter the working hours with each blog message. Phill Brander asked me how l many hours each panel takes and I could not give an exact answer. The best I could do was a guesstimate, so now it is time to record working hours. I will not multiply working hours with an hourly wage and get the cost though!
Saturday, January 03, 2009
Belt sander is too slow, enter the angle grinder!!
After reading some tips on Bjørn Thomassons (master strip plank builder and kayak+canoe designer) website, I tried a new metod for grinding off epoxy last night. With a coarse cleaning disc in the angle grinder, it was very easy to remove any epoxy from the hull panel. They moving on to the belt sander and the sanding pad in the drill. Without having to sand off the epoxy with the beltsander, it was much quicker sanding the hull. I also used far less sandpaper!
One needs to be really careful with the angle grinder though. 100% concentration all the time!
Tomorrow night I hope to get time to use the longboard a bit on panel #5. Otherwise, it is ready for glassing on the outside. One learns all the time..
One needs to be really careful with the angle grinder though. 100% concentration all the time!
Tomorrow night I hope to get time to use the longboard a bit on panel #5. Otherwise, it is ready for glassing on the outside. One learns all the time..

Belt sander back in action..
Frode and I visited the shop where we bought the belt sander last night. We got a new one after some light arguing where the clerk wanted the original box and a bag for the dust. In the end, she accepted that she could just take what she needed to return the sander from the new box. Her alternative would be to have the sander fixed, so she choose a strange position to be obnoxious.
Before we left, we got 108,- norwegian kroner from her, since the sander now had dropped in price?? We did not understand it, but choose to not argue, accept the money and the new sander, and leave the shop.
Before we left, we got 108,- norwegian kroner from her, since the sander now had dropped in price?? We did not understand it, but choose to not argue, accept the money and the new sander, and leave the shop.
Thursday, January 01, 2009
When it rains, it pours..
First the skil saw, and tonight the beltsander overheated or burnt out. I dont know which, but at least it dont run when I press the button anymore. funny how you dont notice things like smoke coming from the sander when you wear goggles and a respirator..
Anyway, panel #5 is now sanded 50%, and I can do the rest with the disc sander. We definately need to get the beltsander back to life though. Great tool!
Anyway, panel #5 is now sanded 50%, and I can do the rest with the disc sander. We definately need to get the beltsander back to life though. Great tool!
Tuesday, December 30, 2008
Mr. DeWalt needs a rest, and some new parts.
Tonight ripping strips was on the program. Frode came over and together we ripped enough strips in an hour to build two new panels. We did not finish the job though as our very nice and smooth deWalt skilsaw busted a bearing or something like that. Afterwards we did not dare to use the saw as it vibrated and made really bad sounds when powered on. Saw goes in under warranty tomorrow (new years eve), but we dont have high hopes for when it will be returned. Good that we now have enough strips to build panel #6 and #7. The flipover of the stations in the mould and stuff like that should have us occupied while waiting for the saw. We can also use the time to make progress on the beams.
Monday, December 29, 2008
Even the best plans..
Tonight I had made arrangmentes with Omar so we could cut some more planks. Alas, his son got a fever so he had to stay at home. Sometimes even the best plans dont work out.. But we did get to transport panel #3 and #4 to his place so they are out of the workshop. It takes 15minutes to re-seal the door to the workshop after opening it, so it is something I try not to do very often.
I also got to pull the staples off panel #5 tonight. Easy and fast work with a horseshoe plier and a deft hand.
To finish off the evening I filled all the "knotholes" in #5, and gave the seams where the epoxy from the first brushing had seeped through a new dosis. Probably not neccesary, but it is nice and reaffirming to se perfect glue lines when sanding.
For tomorrow night, sanding or cutting planks, depending on wheter I can get help and what I feel up to.
I also got to pull the staples off panel #5 tonight. Easy and fast work with a horseshoe plier and a deft hand.
To finish off the evening I filled all the "knotholes" in #5, and gave the seams where the epoxy from the first brushing had seeped through a new dosis. Probably not neccesary, but it is nice and reaffirming to se perfect glue lines when sanding.
For tomorrow night, sanding or cutting planks, depending on wheter I can get help and what I feel up to.
Friday, December 26, 2008
1060 staples a panel..
After working 1060 staples loose tonight, my right hand is a bit sore. Timecount, 2 hours.. If I keep this up, I will have the same right hand as Hellboy ;-)
Panel #5, glued.
Here is a pic of panel #5 on the mould with gunwhales laminated and planks glued. All done in 3 hours last night. I must say I much prefer to work with wood over messing with epoxy. I am not big on painting eather :)
Anyway, panel #5 is a solo project, and I must say that the result is the best so far. Not becouse Frode and Omar is no good, but becouse working alone seems to result in better concentration. Not many gaps between planks on this hull.
Now there is some filling of knotholes to do, pull some staples and sanding, then panel #6 kan be started. Once panel #6 is off the mould, we can flip the stations around. Whohoo!!

Anyway, panel #5 is a solo project, and I must say that the result is the best so far. Not becouse Frode and Omar is no good, but becouse working alone seems to result in better concentration. Not many gaps between planks on this hull.
Now there is some filling of knotholes to do, pull some staples and sanding, then panel #6 kan be started. Once panel #6 is off the mould, we can flip the stations around. Whohoo!!
Gunwhale woes
After a comment by a friend, I began to get some nagging woes over how we have done the gunwhales. I had the opportunity to talk with Phill Brander before christmas and check this out amongst other things. Turned out we have goofed up a bit and need to adjust our gunwhales a bit before assembling the hulls
Phill, here are the photos you asked for, showing the inside of a hull panel and the gunwhale butts.
Here is the inside of panel #4, with the electric stapler in the foreground. The electric stapler is a "must have", as each hull panel requires about one thousand staples!

Phill, here are the photos you asked for, showing the inside of a hull panel and the gunwhale butts.

Here is the inside of panel #4, with the electric stapler in the foreground. The electric stapler is a "must have", as each hull panel requires about one thousand staples!

Sunday, December 21, 2008
Quality control is important
I went down to the workshop at 0200 tonight (I like to stay up late, but get really tired the next day) to check on our laminating work. I am really happy that I did. Two massive airbubbles/areas where the glass had pulled off. Both about 10cm long and 4cm wide. This was two hours after we finished laminating, so the epoxy had not hardened yet. Some quick work with a squeege and it looked good again. This morning the epoxy had hardened substantially and it looked good.
Going over the lamniate again after some hours have become routine when not using the vacuum pump. Usually I find some small air bubbles to remove and stuff like that.
Going over the lamniate again after some hours have become routine when not using the vacuum pump. Usually I find some small air bubbles to remove and stuff like that.
We are rolling..
Feeling good about progress lately. Panel 4 glassed on the inside tonight (note to self: never allow fillets to harden partly before putting on the glass!).
Panel 5 is on the mould, lacking just two planks and the gunwhale before it can be glued. Perhaps we get panel 6 off the mould during christmas so we can flip the stations over. That would be a major milestone for us!
Frode and I did a major decision today. We are cutting our time spent on "strip plank bulkheads" and go forward with plywood bulkheads instead. We have a lot of hours invested in our special bulkheads so far, but enough is enough now that we can get BS1088 gaboon/okume ply. Even with all the hours invested in BHs, there would still be many-many hours to go before they were done, and the result would not be spectacular due to many different reasons (our building skill amongst them). So, next task is the get the beams started, and then it is the foils. Hope Florian gets the CNC macine running!
Panel 5 is on the mould, lacking just two planks and the gunwhale before it can be glued. Perhaps we get panel 6 off the mould during christmas so we can flip the stations over. That would be a major milestone for us!
Frode and I did a major decision today. We are cutting our time spent on "strip plank bulkheads" and go forward with plywood bulkheads instead. We have a lot of hours invested in our special bulkheads so far, but enough is enough now that we can get BS1088 gaboon/okume ply. Even with all the hours invested in BHs, there would still be many-many hours to go before they were done, and the result would not be spectacular due to many different reasons (our building skill amongst them). So, next task is the get the beams started, and then it is the foils. Hope Florian gets the CNC macine running!
Wednesday, December 17, 2008
Building times
I did some quick estimations today on building time in strip:
Planking 5 hours, when done alone.
Sanding the inside and outsite 2 - 3 hours.
Glassing inside and outside 3 + 3 hours
5 + 2 (3) + 3 + 3 = 14 hours for one half hull panel. Scary stuff!
Planking 5 hours, when done alone.
Sanding the inside and outsite 2 - 3 hours.
Glassing inside and outside 3 + 3 hours
5 + 2 (3) + 3 + 3 = 14 hours for one half hull panel. Scary stuff!
Saturday, November 22, 2008
Some days I wish
Some days I wish we were doing something like this instead.
http://a-class.org.nz/daryl.htm
Faster, and you can pop out a lot of hull panels relatively quick. If only I had access to a suitable CNC mill..
http://a-class.org.nz/daryl.htm
Faster, and you can pop out a lot of hull panels relatively quick. If only I had access to a suitable CNC mill..
What do you get..
What do you get when you let the boys off to play with the chemistry set without supervision? You get a mess to clean up :-)
Frode and Omar was to glue the rest of the bulkheads at frodes place last week. Turned out they had a small mix up when measuring the epoxy. It is suppsed to be 100 parts resin to 32 parts hardener. Suffice to say that 50 parts hardener to 16 grams resin dont promote a good result. Frode have to clean the parts, do some sanding and try again.
What did we learn? Mark the tins for resin and hardener with a big marker! I feel partly responsible as I did not mark or leave instructions on what was in the unmarked containers, but as the tins was very different, I knew what was in them.
Frode and Omar was to glue the rest of the bulkheads at frodes place last week. Turned out they had a small mix up when measuring the epoxy. It is suppsed to be 100 parts resin to 32 parts hardener. Suffice to say that 50 parts hardener to 16 grams resin dont promote a good result. Frode have to clean the parts, do some sanding and try again.
What did we learn? Mark the tins for resin and hardener with a big marker! I feel partly responsible as I did not mark or leave instructions on what was in the unmarked containers, but as the tins was very different, I knew what was in them.
Wednesday, November 12, 2008
Looking for materials

We do a round trip looking for good materials to cut into strips now and then. Here is a pic of Frode scouting in the racks at one of the warehouses.
Winterizing.. aka: The tin hat society
Tonight Omar and I spent a few hours winterizing the workshop. The single pane window was insulated with some layers of cardboard cut to fit and an alu foil on top. The port to the workshop was more of a challenge. The bottom now have a rubber gasket fitted. Since the port is made of solid wood, we stapeled some tarred paper on the inside, and topped it off with alu foil. The difference in temperature and lack of drafts was immediately noticeable. Hopefully this is enough to see us through the winter with good and stable epoxy hardening temperatures.

Great fun working with alu foil :-)


Great fun working with alu foil :-)

Friday, October 10, 2008
Carbon fibers arrived
Yesterday there was two big boxes at my front door when I came home. The carbon fiber supplier had shipped the stuff really quick.
Of couse I had to open the boxes to check out the stuff. One roll of weave and one roll of uni, both 100cm wide. This is 400gsm so it is pretty stiff stuff. Wonder how it will be to work with.. Need to be very thorough with the wetting out.
Of couse I had to open the boxes to check out the stuff. One roll of weave and one roll of uni, both 100cm wide. This is 400gsm so it is pretty stiff stuff. Wonder how it will be to work with.. Need to be very thorough with the wetting out.
Tuesday, October 07, 2008
Carbon fibers
We managed to strike a good deal on carbon fibers locally. 36kgs of carbon weave and unidirectionals are on their way. The retail price of 36kgs of high modulus carbon is horrendous, but with the deal we got we can afford to do foils, beams, rudder system and spi poles in carbon. That is good as we need to save all the weight we can if we are to hit min weight.
Friday, August 22, 2008
Back on the sandwagon..
Sanding hull panel #4 now. Busy nights with the beltsander, rotary sander and the torture board..
Tuesday, July 08, 2008
Our first youtube video.
On my latest business trip to the US I bought a small "Digital Hero GoPro3" camera. This nice little unit have a waterproof housing, adapters to mount it to helmets, bicycles etc. and can shoot still pictures, time lapse pictures (one pic every 5th second) or movies. Last night we got to test it out, and it is a good little unit for what it does and the price.
So here we are, Omar and I, laminating and installing a gunwhale first, then gluing the hull panel together. The film was done with the time-lapse function which later was processed into a film. Gives a pretty good impression of what we are doing in a short time.
http://www.youtube.com/watch?v=a7h7_lFcSBc
For those interested, the video was shot from 1900 to 2200, and as you can see it was still lots of sun outside. One of the benefits of living at 63deg North.
So here we are, Omar and I, laminating and installing a gunwhale first, then gluing the hull panel together. The film was done with the time-lapse function which later was processed into a film. Gives a pretty good impression of what we are doing in a short time.
http://www.youtube.com/watch?v=a7h7_lFcSBc
For those interested, the video was shot from 1900 to 2200, and as you can see it was still lots of sun outside. One of the benefits of living at 63deg North.
Saturday, May 17, 2008
New digital scale!

Omars father, Albert, pulled some strings and got us a really good scale for cheap. This scale is a precision instrument and gives us measurements down to 1/10 of a gram. Testet it tonight, and after programming it it was really excellent and consistent. Went on to glass the outside of the hull panel lying on the mould. Good stuff!
Subscribe to:
Posts (Atom)